Advanced Modeling of Surface Modeling: Zhongwang 3D Efficient Design Wine Bottle

For many of the friends who are learning 3D modeling, seeing models with complex surfaces will be considered to be difficult to mold at one time. In general, I can achieve the most complex surface drawing by using the high-efficiency U/V surface function of Zhongwang 3D, but if I know how to “patch together” repeatedly, I can achieve the effect I want more quickly, saving 30%. Operation time, taking the following wine bottle surface modeling as an example.

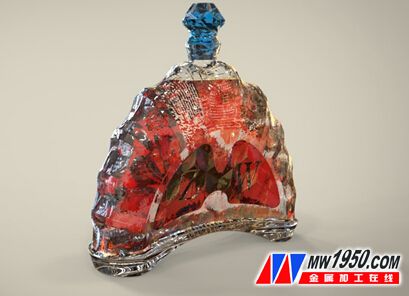
Figure / Zhongwang 3D completed wine bottle modeling
1. Insert sketch 1 on the XZ plane, draw the semi-elliptical long and short axes shown in Figure 1 are 160 and 110 respectively; exit the sketch, insert the XZ datum face 1, name offset 16, and insert a sketch on this datum 2, draw the semi-ellipse shown in Figure 2, the long and short axes are 100 and 80 respectively (remember this data, used later); sketch 2 with XZ plane as the plane of symmetry, mirror copy to the other side ,As shown in Figure 3.

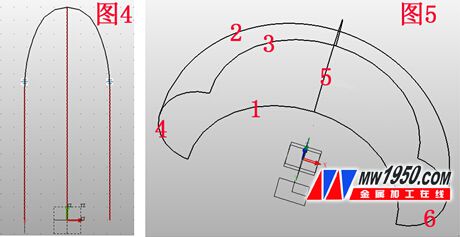
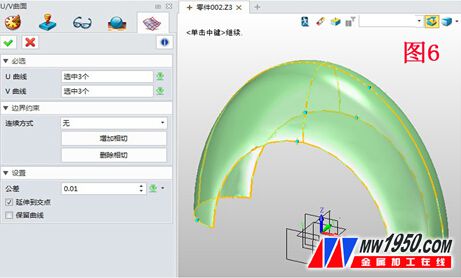
2. Insert sketch 3 on the YZ plane, set the reference curve according to Figure 4, and draw the arc by 3 points; similarly, draw two arcs as shown in Figure 5; click curve-U/V curve, U curve is The curves 1, 2, 3, and V in Fig. 5 are curves 4, 5, and 6, and the effect is shown in Fig. 6.


3. Insert sketch 4 on the XZ plane and draw the curve shown in Figure 7; click on the curve segmentation, the face and curve are selected as shown in Figure 8. Pay attention to the parameter selection; click on the wireframe-boundary curve and select the edge shown in Figure 9. Click OK to prepare for the next step; delete the face according to the effect shown in Figure 10.


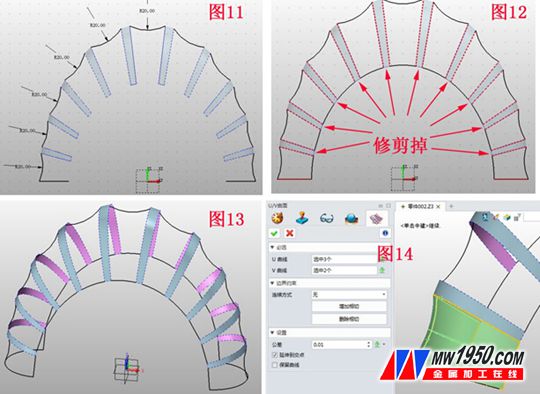
4. Insert the sketch 5 on the XZ plane and draw 11 arcs as shown in Fig. 11; insert the sketch 6 on the reference plane 1 to draw the semicircular arc, that is, the semicircle in step 1 and Fig. 2, pay attention to Fig. 12 Trim to the extra part; after sketching out, sketch 6 to the other side, as shown in Figure 13; click on the U/V curve and repair the surface as shown in Figure 14, and repair all remaining surfaces.

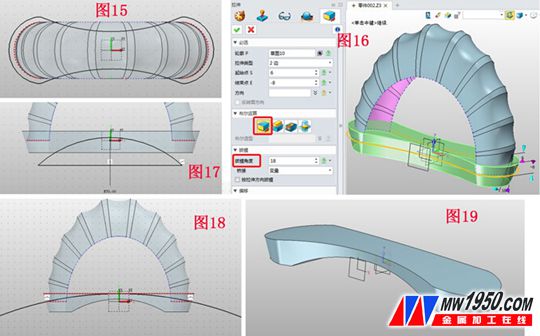
5. Insert sketch 7 on the XY plane, draw the graph shown in Figure 15; stretch sketch 7, pay attention to the draft angle, as shown in Figure 16; insert sketch 8 and sketch 9 on the XZ plane, respectively, and draw Figure 17 and Figure 18 The figure, pay attention to a circle drawn in Figure 18, drawn in 3 points; stretched with the reduction of the stretch, the effect is shown in Figure 19.

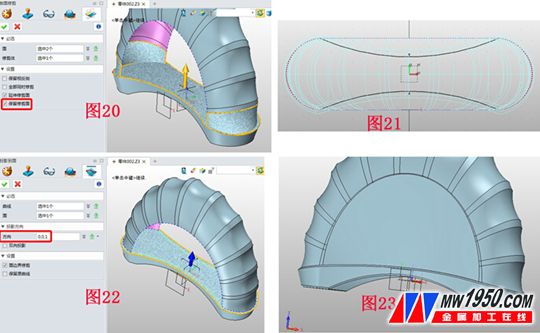
6. Click on the surface trim, select the two bottom surfaces, trim the upper surface of the base, pay attention to the parameter selection, as shown in Figure 20; insert the sketch 10 on the XY plane, set the reference curve as shown in Figure 21, and then draw two An arc; click on the wireframe - project to the face, project the sketch 10 onto the upper surface of the base, as shown in Figure 22; click on the surface - FEM surface, repair the surface, and round the corner, as shown in Figure 23.

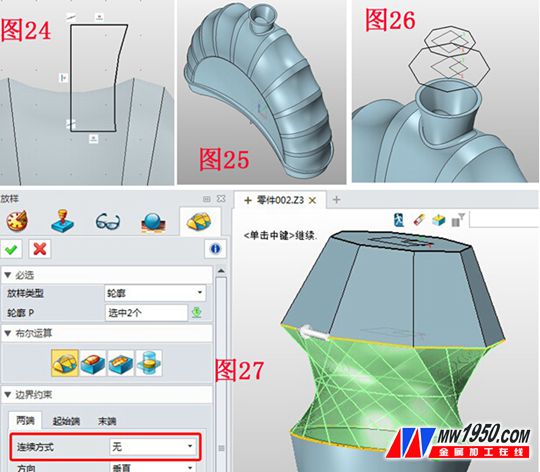
7. Insert the sketch 11 on the XZ plane to draw the graph shown in Figure 24; after exiting the sketch, use the rotation function to rotate, and shell the shell, do the rounding processing, the effect diagram is shown in Figure 25; as shown in Figure 26 The position is inserted into the reference planes 2, 3, and the sketches 12 and 13 are respectively inserted into the two regular octagons; click the stakeout, and the staking is performed as shown in Fig. 27, paying attention to the parameter selection.

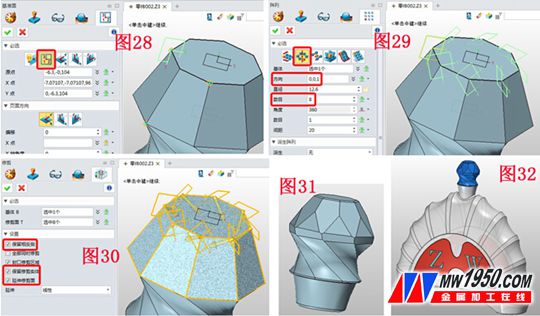
8. As shown in Fig. 28, insert the reference plane 4 in a 3-point manner; perform a circular array on the reference plane 4, as shown in Fig. 29, pay attention to the selection of parameters; click on the shape-trim, and trim the shape with the face of the array, as shown in Fig. 30. And the bottle stopper is rotated according to the method of Fig. 24, and the chamfering treatment is performed, and the effect is shown in Fig. 31. Finally, you can complete the branding according to your favorite style, as shown in Figure 32.

Through the above detailed advanced tutorials, beginners of 3D CAD design can also easily complete high-quality surface modeling works through Zhongwang 3D, and with the 3D CAD drawings of the tutorial, learning can be more effective! You are welcome to download the wine bottle drawings for free in the 3D drawing exchange section of Zhongwang Technology Community to discuss and exchange the new surface modeling new function of 3D2015!

OEM Available ,Multifuction machine can be customized regarding customers' demands. 

Multifunction Plasma Cutting Machine can achieve many functions on one set machine . 

then it will save some cost and can do much work on one machine .

1. Cnc Plasma Sheet Cutting Machine can add drilling head for diameter less 2mm hole .

2. Flame cutting head for cutting more than 20mm-300mm thickness metal sheet. 

3.Marking head for make some logo and sign and some design one metal sheet surface. 

4. pipe cutting can cut 4 Axis Square Pipe and round pipe ,not only surface , also can cut square pipe angle

5.The above functions can choose one or more on one machine , all can be customized.
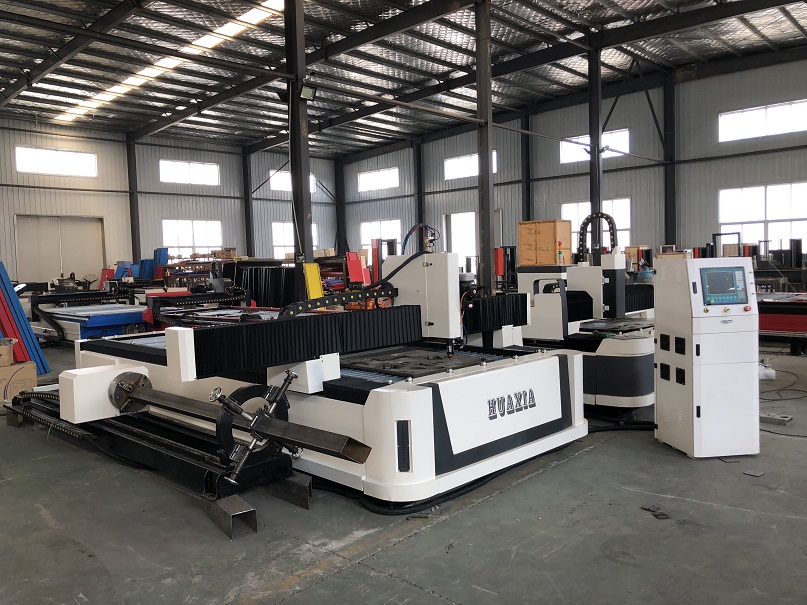
multifunction plasma cutting machine


OEM Multifunction Plasm Cutting Machine

Best Plasma Cutter,Plasma Cutting Table,Plasma Steel Cutting Machines,Plasma Marking Machines

Jinan Huaxia Machinery Equipment CO.,Ltd , https://www.cnformingmachine.com